|
Hanging Framed Artwork
HANGING FRAMED ARTWORK
with J. Tarr
 Many people are baffled when it comes to hanging artwork. Do I use a nail? Do I use a hook? How high should it be? Where should it go? What are the rules for hanging artwork? Many people are baffled when it comes to hanging artwork. Do I use a nail? Do I use a hook? How high should it be? Where should it go? What are the rules for hanging artwork?
Hanging art can involve mixed personal preferences. Everything from decorating to theme setting, lighting, colors, shapes - the possibilities are almost endless and so would the length of this article be if I tried to cover them all. So, I am going to focus on just these important issues:
Height, Grouping, Placement and Hanging Steps
Height
Although there are no strict rules for the correct hanging height of artwork, in general, I recommend that art be hung so that the center point of the image or group of images is at about nose level for an average height person. An average height person in this case is assumed to be about 5'8", which means that the center point for the art would be at about 5 feet - or 60 inches from the floor. While this is not perfect or possible in every situation, it's a good guide to keep in mind - Center of the artwork 60 inches from the floor.
Grouping Artwork
Placing art in organized groups can be very interesting. Groups of images should be thought of as a single unit - as if it were one work of art. Grouping art can be tricky because it introduces issues of interrelationship - ie: which piece should be on top, bottom, left and right and getting the spacing and height just right can be complicated. You can test the actual group arrangements by laying everything out on a large table or on the floor, playing with combinations until you hit upon one or more that works. For the actual hanging process, a very helpful approach - assuming you have paper that is large enough - is to carefully lay the grouped artwork on paper and then trace around each object to determine where the picture hooks should be installed. Just tape the paper up on the wall as a template to determine where picture hooks should be installed. - No heavy lifting. There is a bit more involved with determining exactly where the hooks go, which I will cover later in the Hanging Procedure part of this article.
Placement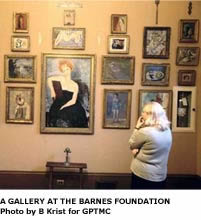
In my opinion, it's important that each work of art have sufficient space around it. That's not to say that you need to agree with me. In fact, some years ago, when my father and I visited The Barnes Foundation (located outside of Philadelphia, PA), we were both amazed at how closely art pieces were hung and how great it looked. On top of that, Dr. Barnes would often hang impressionist works (like a Renoir) right next to an African mask or some other completely unrelated piece - which we found to be really quite exciting.
In general, I find that high ceilings will allow for tighter groupings of large works of art, while lower ceilings will require that you space the same pieces apart.
The important point is that usually art needs space, so you should select a wall location that has sufficient space on the right, left, top and bottom sides. Placing art is sort of a gut feel thing. Personally, I can't give you exact measurements on this, but in general large walls will support large pieces and small walls, small pieces. Choose smaller pictures for narrow walls and larger works for big wall spaces.
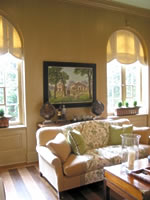 Another important point when installing art near furniture (for accenting) is to relate the size of work of art to the furniture size.
In general, when hanging art over a piece of furniture keep in mind that it should not be longer than the width of the furniture. And when placing pieces above furniture, be sure to exactly center it individually or grouped, in relation to the furniture. Sometimes, you might find that your furniture first needs to be moved a bit to make the overall centering with the wall and art look just right. Another important point when installing art near furniture (for accenting) is to relate the size of work of art to the furniture size.
In general, when hanging art over a piece of furniture keep in mind that it should not be longer than the width of the furniture. And when placing pieces above furniture, be sure to exactly center it individually or grouped, in relation to the furniture. Sometimes, you might find that your furniture first needs to be moved a bit to make the overall centering with the wall and art look just right.
Hanging Steps
Here is the step-by-step process that I use when hanging art. It involves a small bit of math (addition, subtract division), so it might be handy to have a calculator.
Tools required: calculator, pencil, tape measure, masking tape, scrap paper, hammer and hooks & nails that are strong enough to hold the artwork in question.
IMPORTANT TIP
There is one really important measurement that you must know to effectively hang artwork (individually or grouped) and that is the distance of the hanging wire or hanging bracket located on the back of the artwork, to the top edge of the frame. This is an important measurement to know because it relates to the spot where the hook (or nail) will actually attach to your artwork -- and there are absolutely no industry standards for this distance. If you have five works of art, it's unfortunately likely that you will have five different measurements from the hanging wire to the edge of the frame - even when the five pieces come from the same artist or gallery!
MY STEPS FOR HANGING ARTWORK
- Find the horizontal center point for where the artwork will be hung. This could be in relation to furniture or simply the wall or both. For instance, if placing the piece above an existing sofa, desk or bed (for accenting purposes), this will be the center point of the furniture. If simply installing the art on a wall (with no association to furniture), the center point will be the width of the wall, divided by two. Use your tape measure to find the exact center and place a piece of masking tape on the wall to mark the spot.
- Once you have the center point of the wall, measure 60 inches from the floor and place a small pencil mark (or masking tape) on the wall to mark the spot. This is the center point of the image.
- Measure the height (top to bottom) dimension of your artwork and divide that number by 2. This will give us the vertical center point of the artwork. For example, let's say we have a piece that is 20 inches high. Divide this by 2 and we have 10 inches.
- Add the value calculated in Step #3 to 60 inches. In our example we end up with 70 inches.
- Now measure the distance from the top edge of the frame to the hanging wire or bracket located on the back of the artwork. In the case of hanging wire, be sure to take the measurement while pulling up on the wire - because when you hang your art, the wire will be pulled up (like an upside down "V") as it attaches to the hook (or nail). In our example, let's assume that the distance between the wire (or bracket) and the top edge of the art is 6 inches.
- Subtract the value found in Step #5 from the value calculated in Step #4. In our example, we end up with 64 inches. This is the exact spot where the hook or nail will attach to the artwork wire (or bracket).
- If you are using a hook -- and for most cases I recommend that you do, just because in it is usually stronger and safer -- the hook nail WILL NOT be hammered at the Step #6 measurement (in our case 64 inches). Remember, 64 inches is where the hook will attach to the wire or bracket on your art. The nail will actually be a bit higher than 64, depending on the size of hook you are using. The easiest way to know where to hammer, is to put the nail in the hook and position the hook, so that the bottom (or hooked part) is at the height measured in Step #6. (Again, in our example that is 64 inches). You should see that the nail is a bit higher than the spot where the hook attaches to the art. If you are using only a nail to hang, then the Step #6 measurement will be exactly where the nail goes.
THAT'S IT
That's all there is to it. Repeat these steps for each work of art and you should end up with no surprises -- other than a beautifully hung work of art.
One final note. Usually wall spots have different lighting. Some locations are darker than others. In general, I recommend placing bright works, with strong colors, in darker locations and darker works in locations that are better lit. This approach will actually help create an illusion of light uniformity, while avoiding darker pieces becoming lost on less than optimally lighted walls.
I hope that these pointers help make your art hanging experience a bit more enjoyable and easy.
Please pass along any comments or questions to: jtar@tarart.com
If
you have questions regarding the care of your artwork,
please do not hesitate to call us at (631) 223-2700
Copyright © 1995-2013 TIS Corp. All rights reserved.
|